

How to Set Up Double Opt-In Confirmation Emails in Flodesk (NEW Flodesk Feature!)

Next week, Flodesk are officially announcing the release of a native double opt-in confirmation email feature!
I’ve just stumbled across the feature in my account set up, so I thought I’d share a tutorial on how to set this new feature up easily. I have already updated my Email Marketing with Flodesk course with this new feature and lesson, but wanted to share it as I know that some people may have been put off using Flodesk in the past because this feature wasn’t available.
Well now it is, so you have no excuse ;)
If you want to learn more about Flodesk, and why I made the switch from Mailchimp, check out my Ultimate Guide to Flodesk page.
First of all, what is a ‘double opt-in confirmation email’?
When I talk about a double opt-in confirmation email, this refers to the email that automatically gets sent to my subscribers once they fill in a sign up form on my website, asking them to confirm their subscription to my email list. You’ve probably received these yourself before!
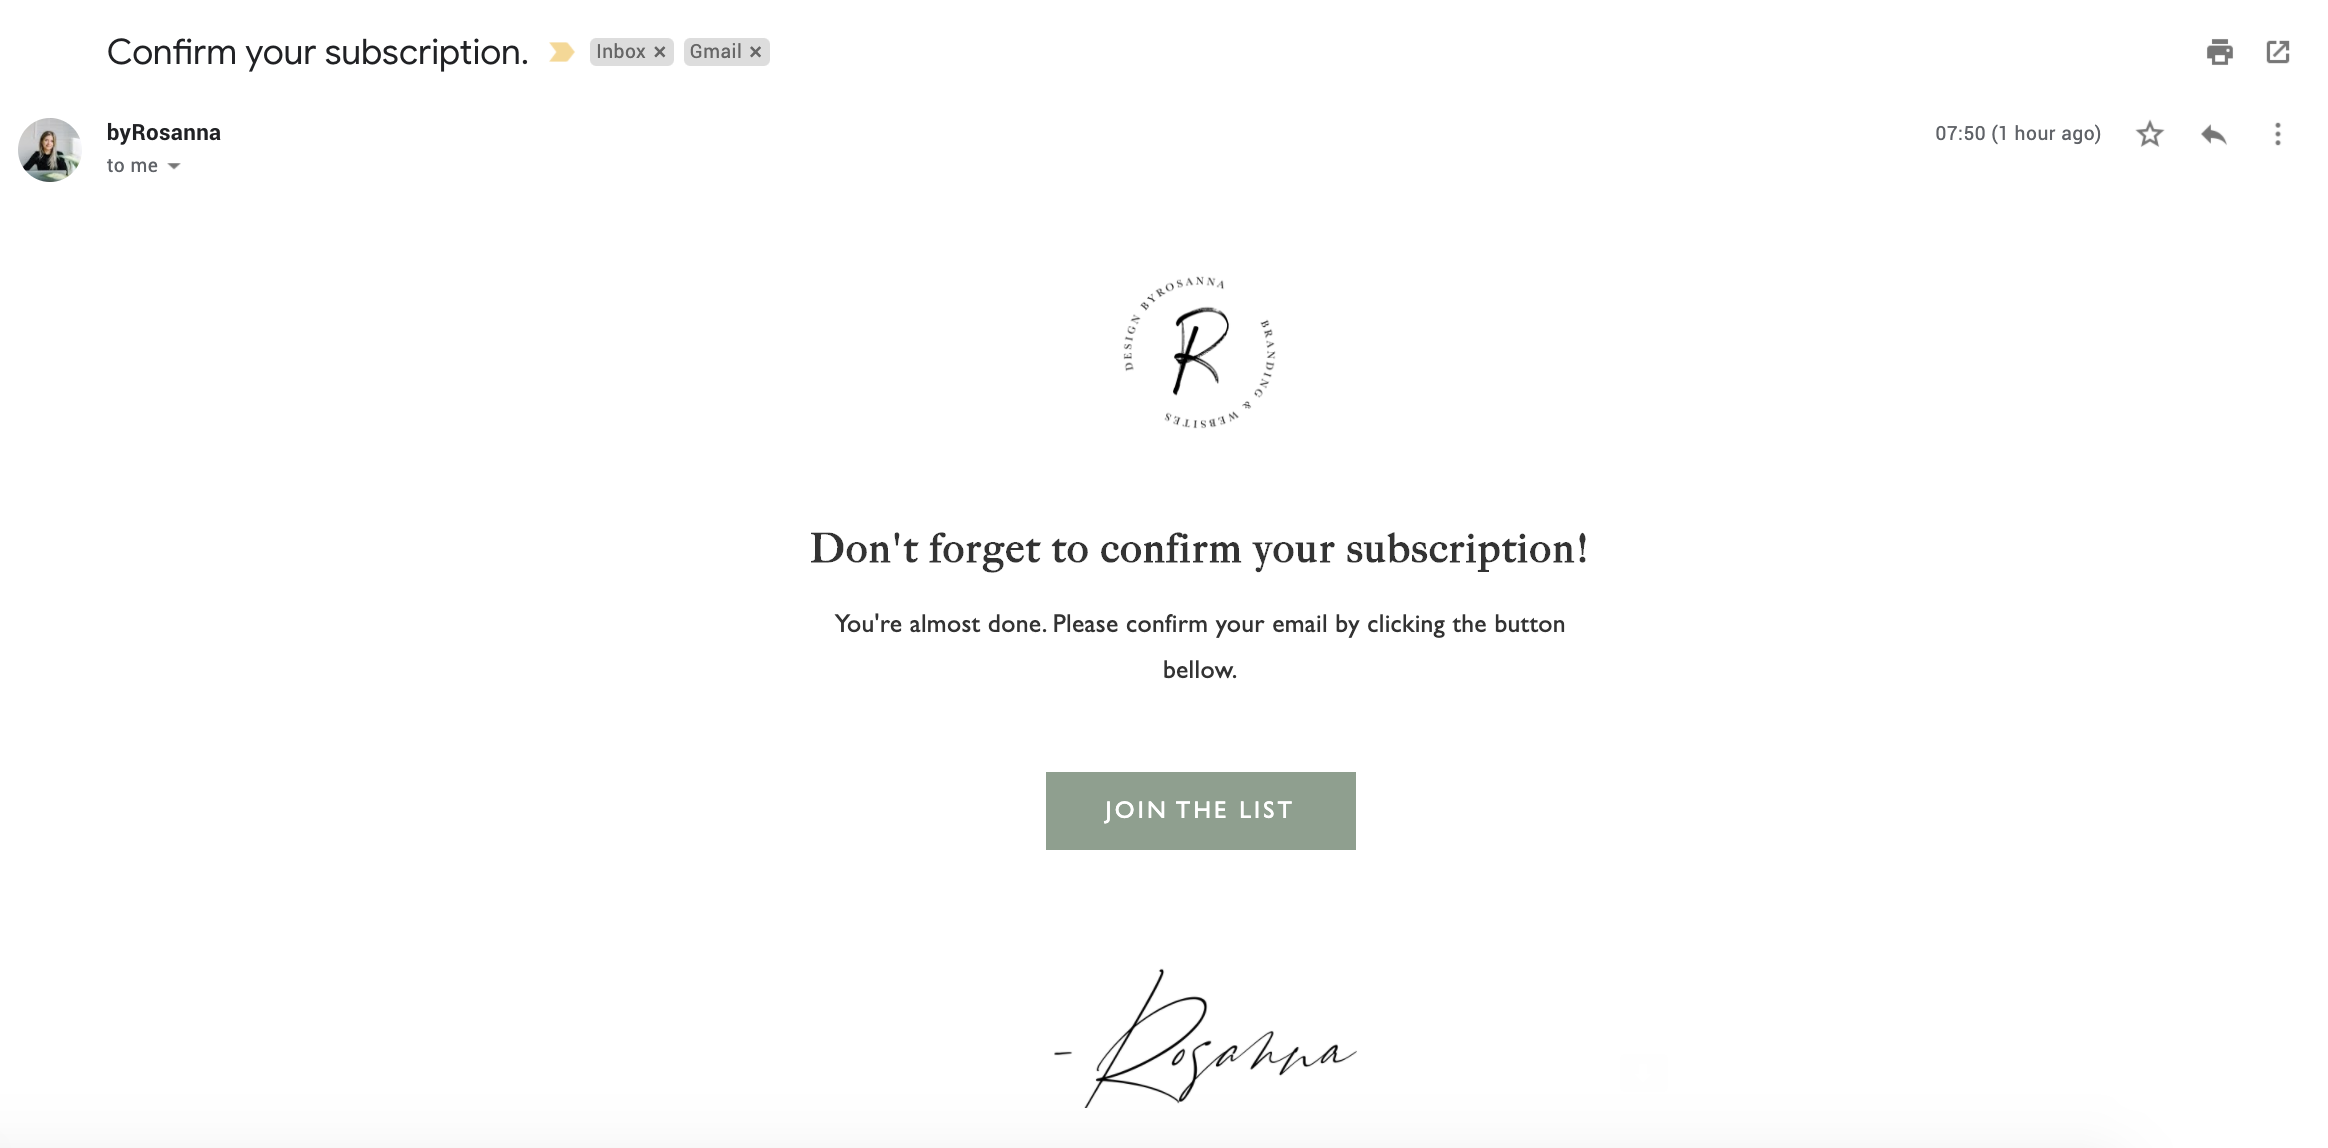
It is sent to the person automatically as soon as they sign up, and usually includes some basic text saying ‘confirm your subscription’, and a button or link that takes the subscriber to a thank you page to let them know they’ve been signed up. It essentially creates a two-step process to ensure they are giving permission for you to use their email address.
This type of feature has been available on various different email marketing platforms for years for several reasons:
Adding a two-step process works as a kind of verification; anyone could technically write anyone’s email address into a sign up form and sign them up for things they didn’t want to be signed up for! But this process prevents that from happening because the owner of the email address has a way of confirming they own it first.
It stops spam, bots and unwanted subscribers from being added to your list (this can cause your bounce rates to increase and affect your overall email list quality.)
It helps you as a business owner to become more GDPR compliant, as these regulations are strict on people giving express permission to use their details, and this adds a second layer of permission. I talk about the legal side of running an email list in my Email Marketing with Flodesk online course.
So how do we set these up easily using Flodesk’s new feature?
You can watch the video tutorial below, or scroll past to follow step-by-step written instructions instead:
Step 1: Customise your double opt-in confirmation email
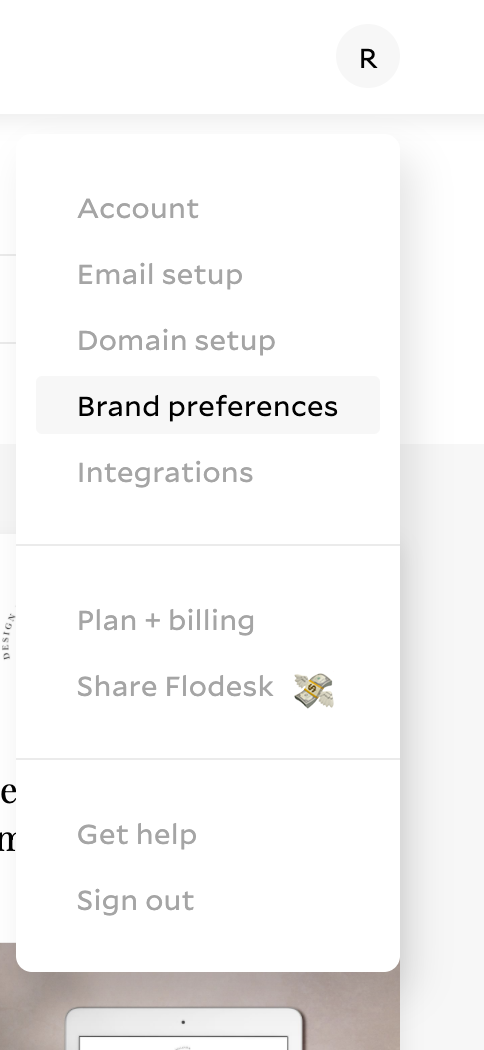
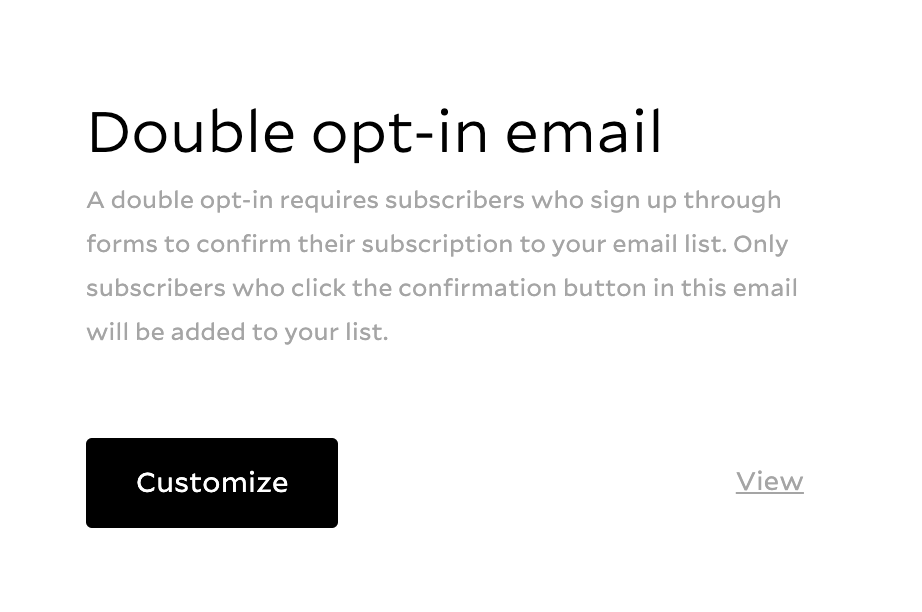
Go to your Account settings and head to the ‘Brand Preferences’ area. When you scroll down to the button, you will now see two new options - including ‘Double opt-in email’. You can click the ‘view’ link to preview what your automated opt-in email will look like, or click the ‘Customize’ button to edit the way it looks and the text.
When you click customize, you will be taken to the Flodesk designer area which looks much the same as for designing your sign up forms and email campaigns. Here, you can edit the text and colours etc. to fit your branding.
However, I would advise that you keep the text really short and sweet.
Your double opt-in email is not the place to add links to freebies or information about you as a business.
You can set things like this up using the Workflows area of Flodesk, but this email is purely functional and needs to be as clear and to-the-point as possible to ensure people click that confirmation button and actually get added to your subscriber list.

^ You will see in this screenshot I have circled the little paper plane icon in the top left corner. If you click this, you are able to send a test email to yourself to preview how this looks in an inbox, and I’d recommend you do this to make sure it’s not going to be sent to spam or anything funky!
You will notice when you do this that you cannot edit the subject line text for the opt-in email.
There is an important reason Flodesk have done this and it is to make sure your opt-in email has the best chances possible to go straight to your subscribers’ inboxes rather than into spam. Giving people the ability to edit this would put your opt-in emails at risk which you don’t want to happen.
Once you have finished customising your opt-in confirmation email, click the ‘Finish’ link in the top right corner.
Step 2: Customise your thank you page
Next up, in the Brand Preferences area, you’ll see the option to edit your Thank You page. This again isn’t anything fancy, just a Flodesk webpage that people are sent to straight after they’ve clicked the confirmation link in the email just to confirm they’ve been added to the list.

Again, you can click the ‘view’ link to preview the web page, or ‘Customize’ to edit it in the designer area.

Here once again you can click on the text to edit it and change fonts, colours etc. and with the Header text you can choose from some of their pre-made messages, or click on ‘Custom’ at the bottom and select the text to type in your own message. When people click on your logo at the top, this will also take them to your website.
Keep this clean and simple as well! It is a purely functional page.
Again, this is not the space to link to your freebies or add more information about you; this should be set up in your Workflows as welcome sequences or ‘lead magnet delivery’ sequences… all this is explained in lots of detail in my Email Marketing with Flodesk course.
Once you’ve finished editing, click the ‘Finished’ link in the top right corner.
Step 3: Add ‘double opt-in confirmation’ to your Flodesk Sign Up Forms
Next, we want to head over to the Forms area of Flodesk and add this feature to your existing forms, or create a new form by clicking the ‘create new’ button.
If you create a new form…
It will first ask you to pick a template (or start from scratch) and to select a Segment you want these subscribers to be added to when they sign up. Choose this and you’ll be taken to the Form designer, where you can edit the sign up form to fit your branding. Once you’re done, click the ‘Next’ link in the top right corner and you’ll be taken to the double opt-in settings, which I’ve screenshotted in the next section…

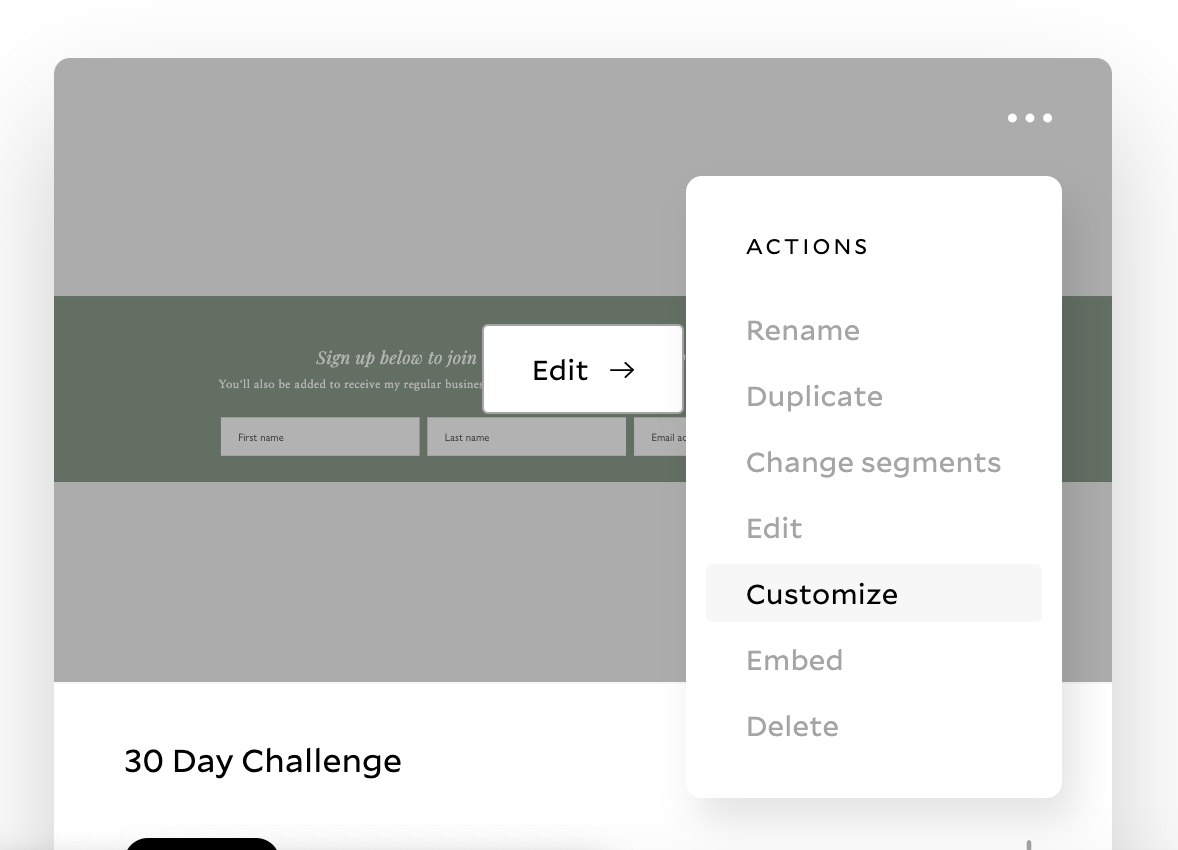
If you want to edit existing forms…
Simply hover over the form you want to edit and click the ‘…’ three dots in the top right corner of the form, and select ‘Customize’. This will then take you straight to the form settings where the first option is to enable the double opt-in email feature.
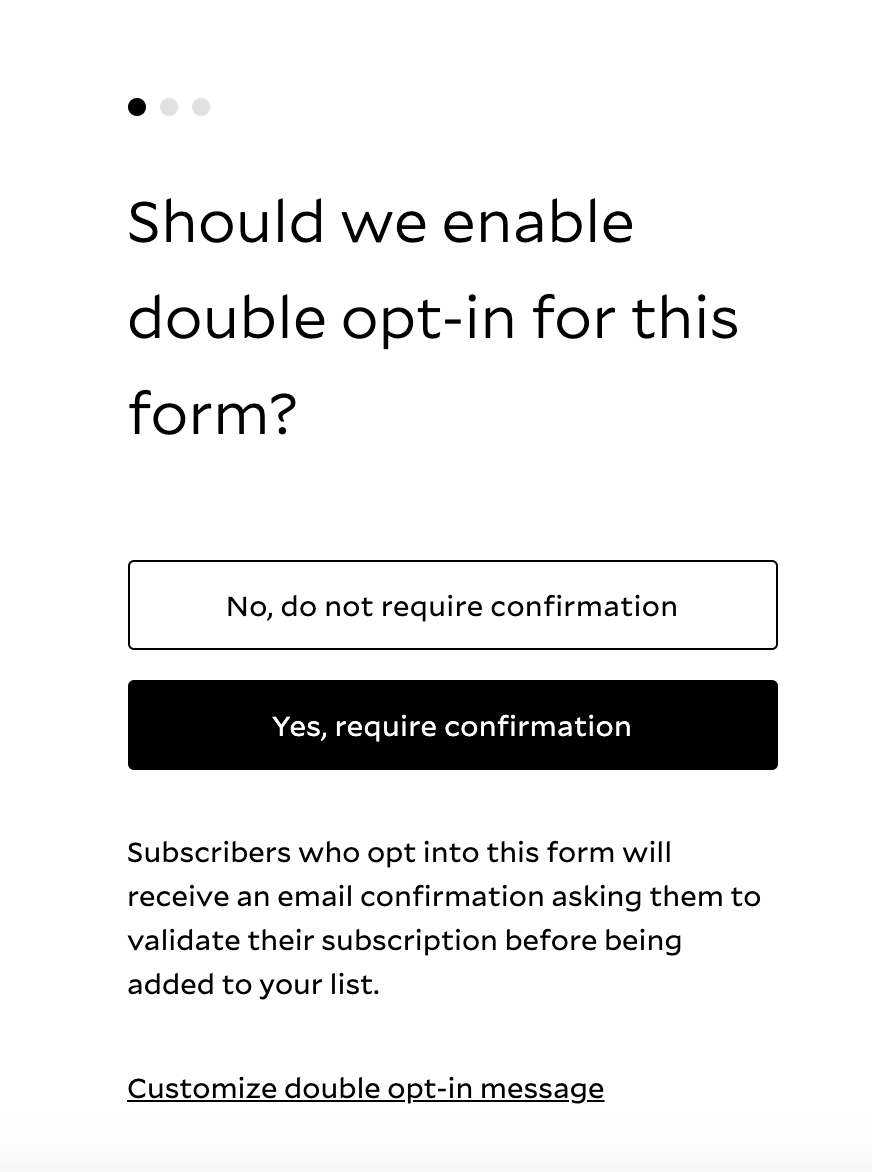
Once you’ve selected ‘Yes, require confirmation’, click ‘Continue’ again in the top right corner and select the options you need, and finally it will take you to the ‘Form Code’ section.
For new forms, follow the steps to add the form to your website. For existing forms that you have already set up, you do not need to do anything further. Flodesk forms automatically update so you do not need to re-add these to your website.
And that’s it!
What happens with my Workflows and Segments?
The double opt-in email will get sent to subscribers immediately after they have filled in your sign up form, and they will not be added to your Flodesk subscribers or any segments or workflows until they have opened the opt-in email and clicked the confirmation link.
Once they have done that, only then will they then be added to the relevant Segment as set up in your sign up form, and thus added to any Workflows you have set up.
This means you don’t need to worry about them receiving several emails all at once (one opt-in confirmation email, plus a workflow/welcome/freebie email), AND it means no one will be able to access any freebies or initial welcome content until after they are definitely on your list.
I hope this all helps and happy emailing!
FLODESK OFFERS A 14 DAY FREE TRIAL, PLUS…
Get 25% off when you join with my link!
HTTPS://FLODESK.COM/C/00G2QH
* The links to Flodesk in this article are affiliate links, which means I get a reward when you join, but it also means YOU get 25% off; win/win! :) I’m also personally a huge fan and total convert to this tool, so I honestly just want to recommend it to everyone regardless of any affiliation.
Want more in-depth Flodesk training?
CHECK OUT MY NEW ONLINE COURSE: EMAIL MARKETING WITH FLODESK
IN THE COURSE YOU’LL LEARN HOW TO:
📓Understand the legal/GDPR information surrounding email marketing
☑️ Set up Flodesk correctly and add/move over your subscribers
🏷 Organise subscribers with tags and segments
📈 Grow your list with sign up forms and opt-in incentives
☕️ Set up automated email sequences and workflows
💌 Plan, design & write amazing emails that get read and clicked on
🌟 Understand email analytics and track behaviours
Made up of video tutorials, slides and a 20+ page workbook, the course is self-paced, downloadable (to go through without internet), has lifetime access and free updates.