

The Simple Way to Manage Social Media

Using Buffer to plan, schedule and analyse your updates on multiple profiles.
For several months, I've been using a combination of Tweetdeck and Facebook's own scheduler to pre-plan my social media content. I'd tried Hootsuite once before, but quickly decided it wasn't for me upon the discovery that it only posts links to images that you upload to tweets, rather than the image itself (unless you have Sthe premium version).
I'd heard of Buffer many times, but assumed (as with a lot of these 'free-mium' services) that I wouldn't get much use out of the free version before being pestered to upgrade.
However, out of desperation, I recently signed up to try it out, and I must say I'm incredibly impressed with how much I can do just on the free version!
Here's how to make the most out of your free version of Buffer:
1 | Sign up and connect your accounts

With the free version, you can have up one connected account from each platform (except for Pinterest - you need the Awesome Plan for that, but you can trial it for 7 days free).
2 | Set up your schedule

Go to 'Schedule' in your account dashboard. Here, you can change how often you want to post to this account by pressing 'Add Posting Time' or hovering over the clock icon and pressing 'X' to remove a time, as well as changing the set times.
You can only create more than one posting schedule in the premium version, but you can manually schedule posts to different times yourself if you want to mix it up a bit (explained in the next step).
3 | Add content to your queue, or schedule it

In the 'Content' section of your selected social account, you can create a status update. Remember to carefully select the account you want to post to (highlighted), and start typing. You can include links (these will be shortened by Buffer to enable link tracking, or they'll transform into 'link previews', like above), as well as images.
If you add your post to your 'Queue', it will automatically be added at the end of your list of already scheduled posts, and will be published at one of the times you set in the 'Schedule' section.
If you Share Next, Buffer will make sure your post is published at the next set time, and if you Share Now it'll post it straight away. Scheduling a post just means you can set your own time and date manually.
4 | Create a backlog queue
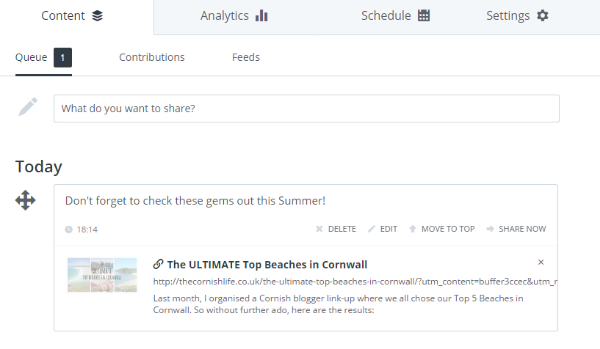
Once you've added your post to your queue, or scheduled it to your own time, it will look something like this. From here, you can move your post up and down your queue if you want it to post on a different day, delete it, edit it, move it to the top so that it gets published next, or Share Now and post it immediately.
5 | Use the Buffer extension and app to add content

AND/OR

Yes that's right; you can add content quickly and easily on the go using the browser extension for Chrome, or the app. There's also some great IFTTT recipes that include Buffer too!
6 | Analytics

Because of Buffer's link tracking, you are able to see the number of clicks per post in the 'Analytics' section. You can also see various forms of engagement, and can filter by most/least popular or by date to help you see what sorts of posts are doing best!
As a social media manager for several different companies (including my own), I am likely to upgrade to the Awesome Plan in a couple of weeks (it's only $10 a month, includes Pinterest scheduling, and will allow me to add up to 10 profiles), but I honestly think for many small businesses, this really isn't necessary. The free version is great, and I hope it makes your life smoother and simpler!
